I post free HDRs on this site. This is a quick usage guide demonstrating the techniques required to get optimal results.
Adding an HDR
HDR images work best using the cycles render, as the Internal Render Engine doesn’t render these correctly. To add an HDR in cycles, first head into the node editor, and use material mode, and select the world texture. Second check use nodes:
![]()
Third add an Environment Texture (Shift–A>Environment Texture) and connect it to the input of the background node (a background and output node should appear when Use Nodes is checked. If not, add them using the Shift–A menu.
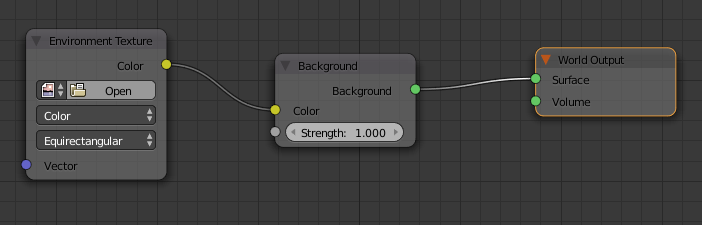
Fourth the HDR is added to the scene, by clicking the open button on the environment texture node, and selecting the correct downloaded .HDR file.
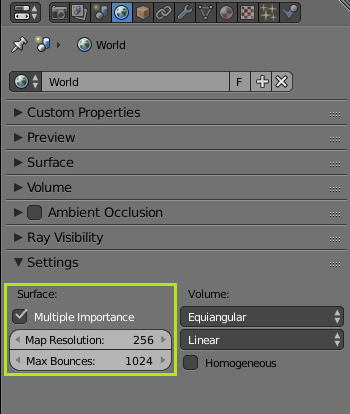
Finally, to massively improve render performance, check multiple importance sample in the world properties, under settings. The map resolution may need to be increased for higher resolution HDRs.
The HDR should now be working, give it a test render.
Setting Exposure
I make an effort to choose a good exposure for every HDR that I post; despite this effort, the exposure won’t always look right, depending on the scene. Adjusting the exposure of an HDR is easy, It is even possible to closely match the exposure of a camera.
To set a new EV for an HDR, it is first necessary to determine the difference in EV between the current HDR’s brightness, and the target EV. The EV of every HDR on this site is posted under Specifications, under “Set EV”. The next step is to subtract the target EV from the current EV, and then apply that EV to the image.
Here is the node setup for applying EV:
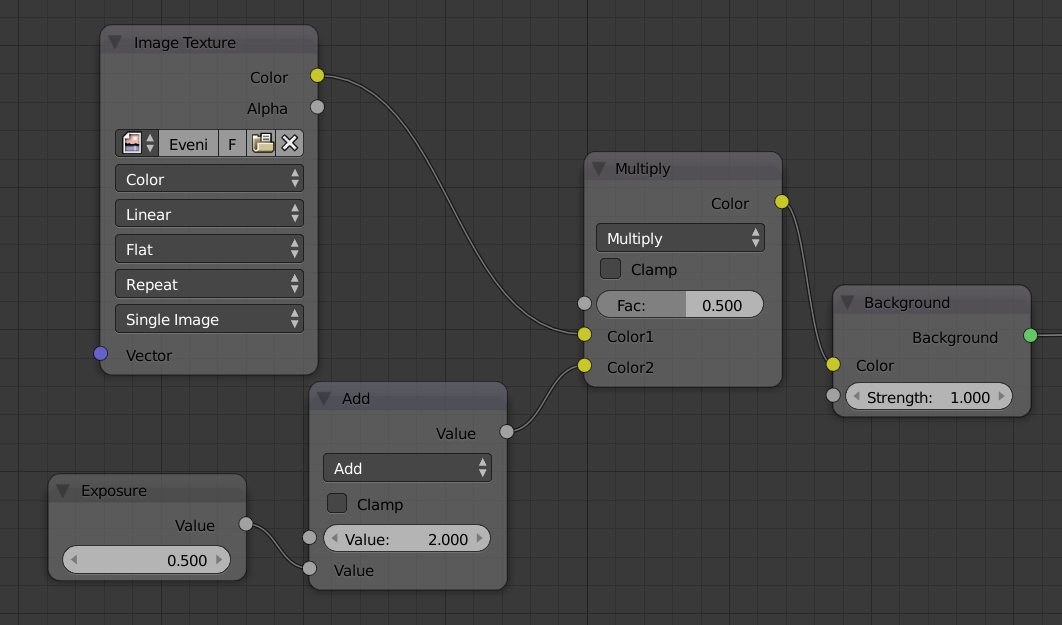
The image is the incoming input on the top, and the EV is the bottom.
An EV can be derived from camera settings, using the formula
$$EV = \log_2(\frac{N^2}{t})$$
Here is a blend file containing a cycles node implementation of the formula in addition to some other EV tools:
It is not necessary to set an EV, the exposure/brightness of a scene can be set simply by adjusting by eye, using the add or subtract node. There is no correct brightness, it is entirely a subjective thing, exactly like setting the exposure on a camera. The big difference here is we are changing the brightness of the lights and not the camera, 3D is slightly backwards like that, from a cinematography standpoint.
CUDA Error
A common issue with using HDRs is running out of GPU memory when running in GPU mode. When this happens the render will quit and this error will be given:
CUDA error: Out of memory in cuArrayCreate($handle, &desc)
This error occurs when the HDR is to big to fit into the memory of a particular graphics card. There are two solutions:
- Buy a better graphics card
- Make the HDR smaller
Making an HDR smaller is not as easy as it seems. A lot of software that “claims” to handle HDR files may actually have difficult with the extremely high values found in some HDRs that include the sun. The best option for scaling the image is blender.
In blender, switch into composting mode in the node editor and check Use Nodes
![]()
Delete all the default nodes, and add four nodes, using the Shift–A menu:
- Image Texture
- Scale
- Crop
- File Output
The reason I choose File Output over Composite is to avoid having to set the dimensions of the render. After linking the images up, select the HDR that is going to be edited using the open option on the image node.
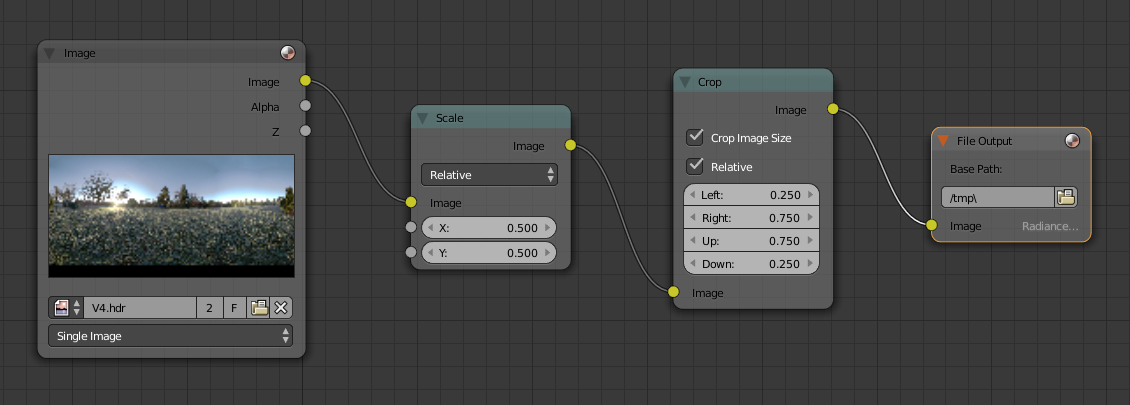
After linking the nodes, set the values of the scale and crop nodes to match those in the image. They are currently set to scae the image to 50% size. In a large number of cases, 25% scale may work better.
The first scale node cuts the size in half and then the crop node cuts of the black borders the scale node leaves behind (25% off each side). Be sure to set both nodes to relative, and check Crop Image Size on the crop node. The output node saves the image, be sure to set it up accordingly, so that it saves the correct file type: Radiance HDR (You can also convert to .exr if you like).
To scale to 25% size, the values for the nodes should be, left to right top to bottom:
- Scale:
- X: 0.25
- Y: 0.25
- Crop:
- Left: 0.375
- Right: 0.625
- Up: 0.625
- Down: 0.375
For calculating the node values for other scale factors, the formulas are
Left and down:
(1 – [Scale Factor])/2
Right and up:
(1 – [Scale Factor])/2 + [Scale Factor].
I love free stuff, and your HDRs are cool. But I have to say I don’t understand the “setting exposure” thing, a complete node setup screenshot with the corresponding settings from one of your HDR post could help.
The “download EV-Tools.blend” button needs some fixing (link).
Thanks for all!
Hi Bithur,
Apologies for the late reply, I forget to check these comments :/
I can see where your confusion regarding the setting exposure node tree comes from, I have updated it.
Regarding the download button, everything seems to work as expected, do you have any more details on the issue?